Friday 5 April 2013

Artefact 5 Evaluation

My Final artefact


I have fixed some problems which occurred in this scene. The two problems were that the texture of the flooring on the left hand side of the floor didn't tile correctly. I fixed this by re-tiling the plane which I used as the flooring and correctly tiled the floor again. 

The second error which I found was that the rug on the floor was slightly raised when nothing was underneath it. I fixed this by pushing down the selected vertex using soft selection.


Artefact 5 Progress

I have decided to model a bunk bed for this room as I think that it will fit the room nicely. I have found many references which have given me an idea on how to model and design it. I have chosen to make a wooden one with a birch wood effect which is quite a light coloured wood which will complement the pink and white themed room. Below are some of the reference I have found.


Another interesting that I came across when researching was that many of these bedrooms have posters and cartoon characters on the walls. I have incorporated this into my design and I think it works quite well. It adds to the characteristic of the bedroom and it makes it more obvious that its a girls bedroom. Below are some images which I found that support this:


I have done a quick render to show how I have used these within my artefact.


Artefact 5 - Progress


I have looked further into girl’s bedrooms and have found that many of them have patterned wallpaper on the wall. Here is an example of one bedroom which I found online. I am using these images to reference and then put my own spin on them.


These are great examples of the wallpaper texture which I'm creating. I have created my own texture and I have done many trial and error tests to ensure that the pattern tiles correctly in the bedroom. Below is the texture that I have created, I have used the cupcake idea which I found online (reference above)


Artefact 5 - Research/Plan - Different occupier in room. Experimenting with textures

With my final artefact I thought I’d recreate the bedroom that I previously made. I want to see how much the room can change when a different person moves in. I am creating a bedroom for a young girl which is about 4 -6 years old. I want to show how I can re texture the whole room and change the furniture to accommodate the new occupier. I thought this would be interesting as I can compare the two and see all the difference and how the atmosphere can change by a new person occupying that space. I have been researching young girl’s bedrooms and found that the main colour scheme used is pink and white which is no surprise. I chose to do a child’s bedroom as this will give me a chance to experiment with different techniques such as applying a wallpaper pattern texture to the wall. As well as creating a child’s bed and patterned bed sheets. I will keep some of the typical things in the room as the previous artefact which will be expected such as the flooring, windows and skirting boards as people usually keep them the same when they move into a house.

I have been researching girls bedrooms and found come great images to give me inspiration for when I’m modelling the bedroom.


Currently I am creating a wallpaper texture which will be on all of the walls, I will upload the texture that I have created in my next post

Wednesday 3 April 2013

Artefact 4 Evaluation / versions (not complete


This is the previous version that I showed in my tutorial. I had come comments about the Z Depth and closeup effects the I used. I was told that in a real life situation the ashtray would be in focus along with everything else which is inline with it. I fixed this issue by taking the blur effect out of the table and everything else which is inline with the ashtray.

Another piece of feedback I received was that my ash texture in the ashtray didn't look as realistic as the rest of the objects in the scene. I fixed this by creating a ash texture and applying it in 3ds max and then touching it up in Photoshop.


Artefact 4 - Research


When thinking about my 4th artefact I wanted to explore close up camera angles and z depth. When I researched into this I found general images of this, but not specific to what I want to do. I have thought on how I could incorporate this idea into the bedroom that I created for my previous artefact. I decided to do a close up of an ashtray with cigarettes inside of it, which will be on a table. I think that this will be a good artefact as it is different from the rest that I have created. When creating this artefact I will have to make sure that my modelling is accurate and of a high quality this is because even the smallest detail will show up when creating a close up angle shot.  I will do this by creating my own HQ textures in Photoshop so that they scale and tile correctly. I will be using mental ray for the texture of the ashtray to give it a glossy effect which will reflect light and also I will be creating other object which will be on the table.  

Below are some images which I have found that I can reference. I am particularly looking at the cigarette textures and smoke effect.


After looking at these images I have started to make the textures for the cigarettes and experimenting with mental ray textures to use for the ashtray   

Artefact 4 Planning - Close up Z Depth

For my 4th artefact I wanted to experiment with something different. Something I have never done before so that I can research on it and expand my knowledge of different aspects of creating images. For this particular artefact I want to model some objects and do a close up shot with Z Depth. So I would focus on one main object and ideally the rest of the objects and background would be blurred out. I have used z depth technique once before in my external client work and it turned out really well, so I thought I’d try using that with a close up shot and see how well it works out. I have researched into close up z depth image and have found some nice examples which have made me think about different angels and the use of blur for the background objects / background.


As you can see from the images above, the main focus is on one object and the rest you can still see but are slightly blurred out, just enough so that you can still see what objects they are but not quite enough to completely distort them. I am thinking of different ways to inappropriate this within my artefact, i am specifically thinking of what type of objects that I could use.

Artefact 3 Evaluation (not complete)

Evaluation here... (ideas, Not complete)

Depressed
Dark lighting
Modeling bottles
Picture fallen off wall - rule of thirds
Speaker fallen down
Capture memory of the persons mood
Story to my artefact
Retired  musician - record on the floor, concert on the TV speaker on the floor
Broken bed, sheets messy
dirty rug
blured background

Artefact 3 - Progress - More Planning & Research

Once getting my ideas together I decided to research some images linked to depressing bedrooms. I came across many interesting images that I could reference into my own work.


As you can see most of these images are bedrooms which are messy, caused by depression. the main factors in these images are alcohol and low light levels. I will incorporate these factors into my artefact 

Artefact 3 - Depression (planning)


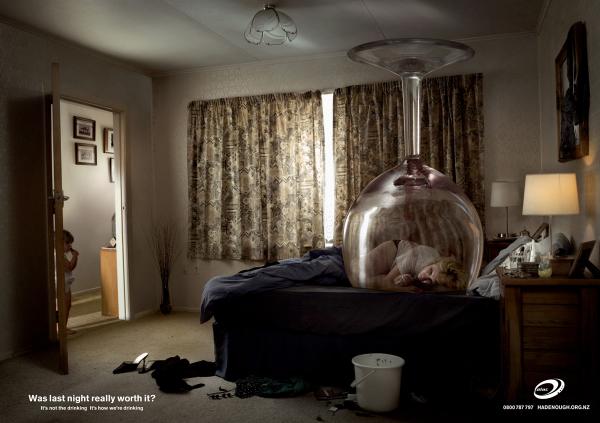
For my 3rd artefact I have decided to create a depressing mood to the bedroom that I created. I discussed this artefact idea within my tutorial and gained some really good ideas on how to create a depressing atmosphere in a bedroom. Some of the ideas that I thought of are that the bedroom should be slightly messy to show that the person living there doesn’t care about presentation, and there is bigger things on his mind. 

To create this messy environment I have thought about modelling alcohol bottles and placing them around the bedroom e.g on the floor and bed. Once I thought about some of these ideas I decided to research into depression itself and I came across some interesting facts:

“Depression is more than simply feeling unhappy or fed up for a few days. We all go through spells of feeling down, but when you're depressed you feel persistently sad for weeks or months, rather than just a few days.”  - NHS -http://www.nhs.uk/conditions/Depression/Pages/Introduction.aspx


This shows that depression can be a long lasting feeling which will show in my artefact that the bedroom would have been in messy circumstances for quite some time.

Another interesting article I came across about depression is that people suffer different types of depression.

“Winter depression is still a mystery to scientists who study it. Many things, including brain chemicals, ions in the air, and genetics seem to be involved. But researchers agree that people who suffer from winter depression -- also known as "seasonal affective disorder," a term that produces the cute acronym SAD -- have one thing in common. They're particularly sensitive to light, or the lack of it.” http://www.webmd.com/depression/features/seasonal-affective-disorder

This could show that the person that occupies this room gets depressed in the winter or night times as they could be sensitive to light or the lack of it. These are some of the ideas that I want to incorporate into my artefact.